Measurement System Analysis
Measurement System Analysis (MSA), is a method to identify the components of variation in the measurement. It is used to quantify the impact of measurement errors and to ensure the integrity of data used for analysis.
Just as a process has inherent variations, the process of measurement has variations too. Therefore, when making decisions that relies on data, it is important to ensure that the systems that collect that data are accurate and precise. Although it may not be possible to totally eliminate measurement errors, the objective of MSA is to ensure that measurement variance is relatively much smaller than the observed variance.
MSA is an important pre-requisite for data analysis. This is because a measurement system that is not accurate and/or precise may lead to wrong decisions being made. For instance, a process plagued with measurement errors may seem incapable and making improvements to the process may make matters worse.
Sources of Variation
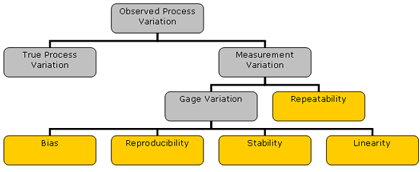
The process variance observed comprises of the true process variance and the measurement variance. The source of measurement variation (error) can be characterised in five ways as shown in the figure below.

Precision and Accuracy
Measurement errors may be one of the 4 scenarios given below. Generally, low accuracy could be due to stability, linearity or bias issues. Low precision could be due to reproducibility (if there is more than one operator) or repeatability (if one than one trial per operator).

Relevance
Relevance is the most important property of a measurement. If the measurement is not relevant to the customer or the system cannot distinguish want the customer perceive as “good” or “bad”, the most capable measurement system would still be pointless. It is therefore important to establish good operational definitions for measurements that reflect the customer requirements.
Resolution
The resolution of a test is the finest gradation on the measurement scale. A measurement system with insufficient resolution made hide variations that exist and invalidate analysis results. It is generally recommended that resolution is at least 1/10 of the lesser of specification tolerance and process variation.
Bias
Bias is the difference between the standard value and observation value and linearity is the consistency of accuracy across the entire range of measurement system. For example a weighing scale is bias if it is always measuring greater than zero in it free state and it is linear if it has the same accuracy for measuring different weights. The linearity and Bias study can be used to determine the accuracy of your gage over the entire expected operating range.
Stability
Stability is the variation in measurement of the same unit measured by the same operator using the same equipment over time. A gage is stable its degree of precision or accuracy does not change over time. The stability of gages can be monitored by the used of control charts on internal reference material.
Capable Measurement System
The following are general characteristics of a capable measurement system:
- Stability over time
- Small measurement variance to process variation ratio
- Small measurement variance compared to the specification limits
- The measurement system should have sufficient resolution
Improving Gage Capability
The way to improve the gage capability depends on the source of variation identified. If the dominant source of variation is repeatability, the problem is likely to be with the measuring equipment, which may require maintenance, replacement or calibration. If the dominant source of variation is reproducibility, you should investigate the root cause for causing differences between operators. Low reproducibility problems could be due to lack of training, poor operational definition and standard operating procedure not followed or absent.